
Whether you're laying engineered hardwood in a condo, tiling a sound-sensitive commercial space, or finishing a basement renovation, what goes under your floor matters as much as what goes on top. Jelinek QuietCork™ underlayment is one of the most effective and natural ways to improve your floor's acoustic performance, comfort, and longevity - but like any quality product, the results depend on how well it's installed.
This guide covers everything you need to know: subfloor preparation, floating and glue-down hardwood installation, perimeter acoustic detailing, and ceramic tile applications.
Before You Begin: Subfloor Preparation
No underlayment can compensate for a poorly prepared subfloor. Before installing QuietCork™, confirm that:
The subfloor is clean, dry, flat, and structurally sound
Concrete substrates conform to ASTM F710
Moisture testing has been performed per ASTM F2170 or ASTM F1869, if required by your flooring manufacturer
Any required vapor retarder is installed before the cork goes down
⚠️ Important: QuietCork is not a vapor barrier. For floating systems over concrete, if your flooring manufacturer requires moisture protection, install a minimum 6-mil polyethylene vapor retarder directly over the slab before placing the underlayment. Overlap seams per the vapor barrier manufacturer's instructions.
Installing QuietCork™ Under Engineered Hardwood
QuietCork supports three installation methods for engineered hardwood: floating, glue-down, and nail-down/staple-down.
Floating Installation
This is the most common approach.
If a vapor retarder is required, install it over the concrete slab first.
Rolls: Unroll QuietCork over the prepared subfloor and allow it to relax if needed. Sheets: Butt seams together, do not overlap.
Tape seams with polyethylene seam tape, acrylic construction tape, or similar. This prevents cork from shifting during hardwood installation. Taping is optional but recommended.
Maintain a minimum 1/4” expansion gap at all walls and vertical obstructions. Follow your hardwood manufacturer's specific requirements, as a larger gap may be required.
Install engineered hardwood per manufacturer instructions.
Critical: Do not glue or mechanically fasten the hardwood to the cork. The floor must float freely.
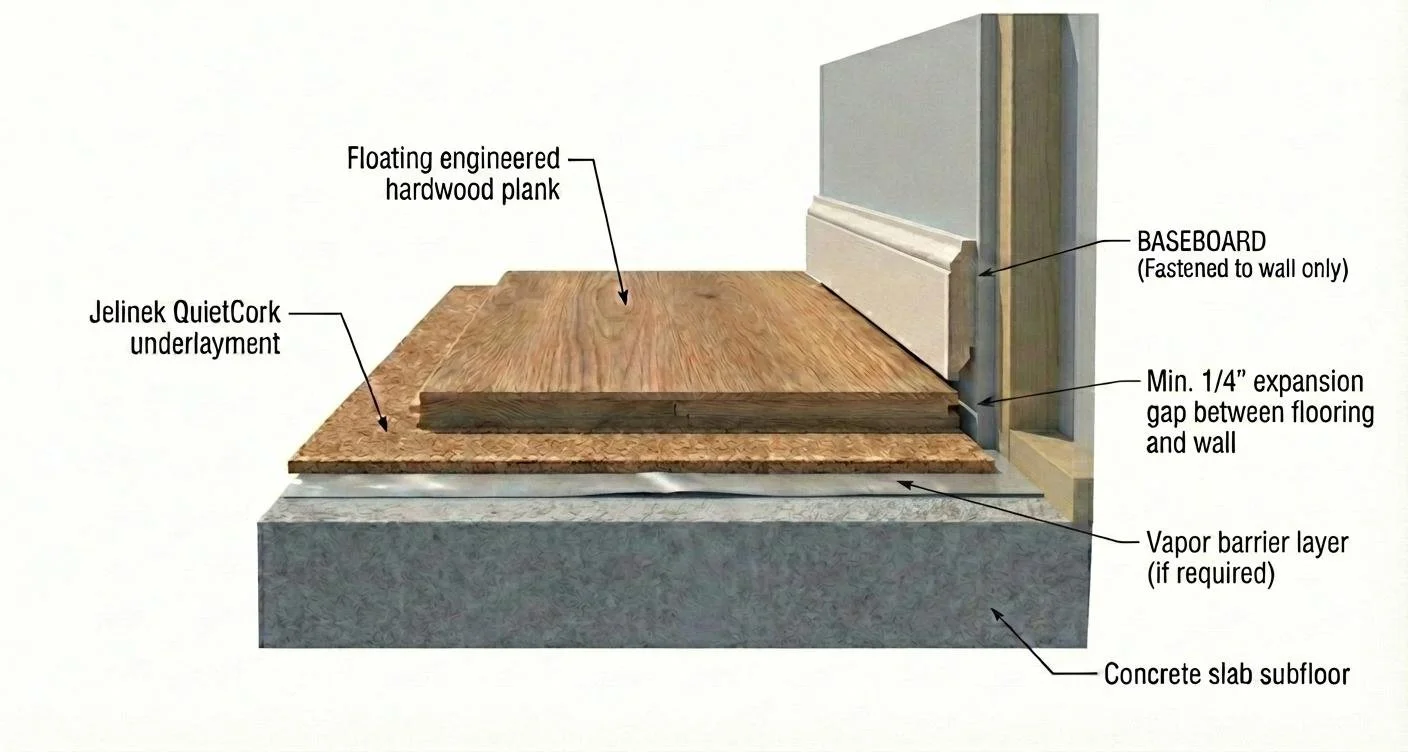
Floating installation: concrete slab subfloor → vapor barrier (if required) → Jelinek QuietCork™ underlayment → floating engineered hardwood plank. Baseboard is fastened to wall only, never to the floor.
Glue-Down Installation
QuietCork must be fully adhered to the subfloor before any finished flooring is installed.
The adhesive your floor manufacturer recommends for hardwood is often also suitable for bonding cork underlayment. Dedicated cork underlayment adhesives include Roberts 7250 and HENRY 1171N SureLock Pl. Always follow the adhesive manufacturer's trowel size, open time, and curing instructions.
Important: Roll the cork immediately after placement using a 75–100 lb roller to ensure a proper bond.
Install engineered hardwood over the cured cork per manufacturer instructions.
Nail-Down / Staple-Down Installations
QuietCork has been used successfully in nail-down and staple-down installations, laid out similarly to floating applications. However, because cork is resilient and compressible by nature, it may not be suitable for every fastening system.
⚠️ Always verify fastener holding performance and system compatibility with your hardwood flooring manufacturer before proceeding with nail-down or staple-down installations.
Perimeter Isolation: The Detail That Makes a Real Acoustic Difference
If sound performance is a primary goal, such as in a multi-family building, home theater, or any space subject to IIC or STC requirements, a perimeter isolation barrier is highly recommended.
Why It Matters
Even a high-performance underlayment like QuietCork can fall short of its rated acoustic potential if sound bypasses it through the wall-floor junction. This is called flanking transmission: impact and airborne sound travel through rigid structural connections at the perimeter rather than through the floor assembly itself. A cork perimeter strip breaks that rigid connection.
Materials
A 1/4” to 1/2” thick cork perimeter strip, cut from QuietCork sheets or rolls, should be adhered along all walls, columns, pipe penetrations, door frames, and other fixed vertical obstructions before hardwood installation.
Installation Procedure
Complete subfloor preparation and install the vapor retarder (if required) before installing the perimeter strips.
Cut cork perimeter strip material for each wall segment and vertical obstruction.
The strip should contact both the subfloor surface and the wall face, creating a continuous acoustic break around the entire perimeter.
Adhesive-backed strips: Peel and adhere directly to the wall with the bottom edge flush on the subfloor. Non-adhesive strips: Brush water-based contact adhesive onto both the wall surface and the cork, allow to dry completely, then bond.
Install QuietCork underlayment per the applicable method. The main underlayment should butt up to (but not overlap) the perimeter strip.
Install engineered hardwood per manufacturer instructions, maintaining a minimum 1/4” expansion gap between the hardwood and the perimeter isolation strip. The wood flooring must not contact the isolation strip.
Optionally, trim the cork isolation strip to be flush with or just below the surface of the finished hardwood.
Install baseboard or base molding fastened to the wall only (never to the floor). The baseboard should cover the cork strip and expansion gap without compressing or bridging the floor to the wall.
Do not fill the expansion gap or perimeter isolation zone with caulk, grout, or any rigid filler.
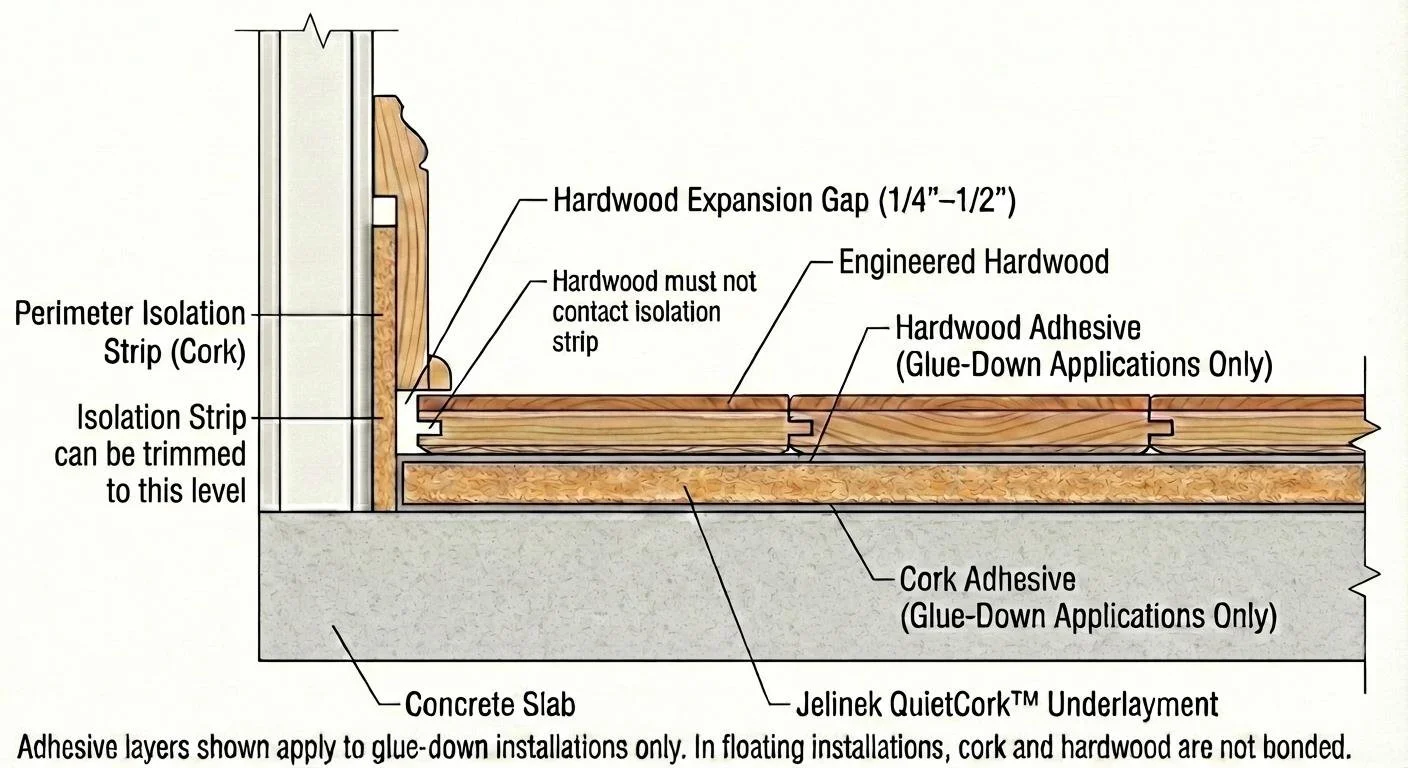
Cross-section showing perimeter cork isolation strip, expansion gap, and full floor assembly. Adhesive layers apply to glue-down installations only; cork and hardwood are not bonded in floating installations.
Installing QuietCork™ Under Ceramic Tile
QuietCork also supports ceramic tile installations following TCNA Handbook Method F135-05, designed for plane, above-grade concrete in residential sound-rated floors.
Note: This method is for interior, dry areas only. Floor tiles must be 8” × 8” or larger. Deflection must not exceed 1/360 of span. Maximum slab variation: 1/4” in 10’-0” from required plane.
Materials Required
Jelinek QuietCork 1/2” Underlayment (Density 11.8-13.6 lbs/cu ft)
Organic Adhesive: ANSI A136.1 Type 1 (for bonding QuietCork to concrete)
Latex-Portland Cement Mortar: ANSI A118.4 (for bonding tile to QuietCork)
Epoxy Grout: ANSI A118.3
Resilient Caulk and Perimeter Isolation Barrier
Installation Steps
Bond QuietCork to the prepared concrete subfloor using Type I Organic Adhesive (ANSI A136.1) per manufacturer's instructions.
Install ceramic tile over QuietCork with Latex-Portland Cement Mortar (ANSI A108.5). Ensure a minimum 3/32” bond coat.
Grout tiles with Epoxy Grout (ANSI A108.6).
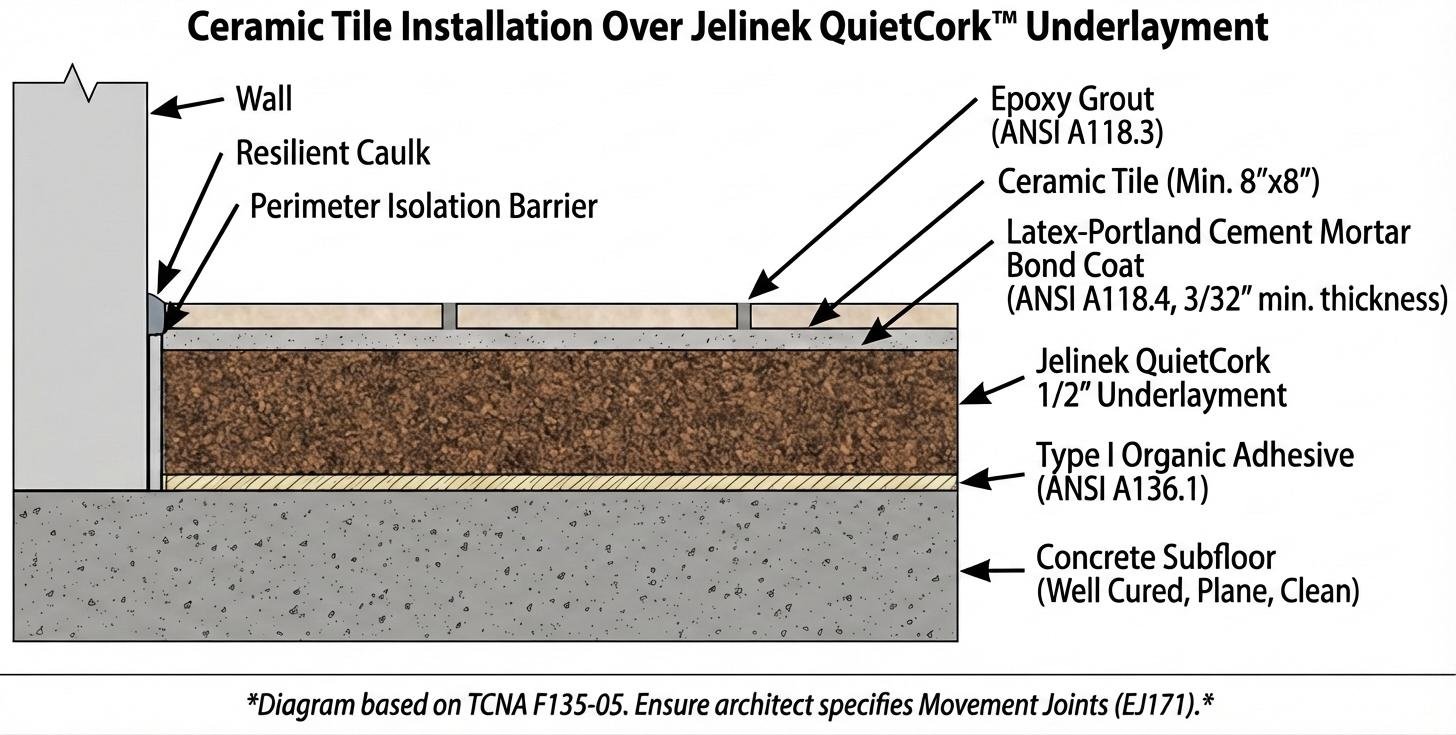
Jelinek QuietCork Layer Diagram (F135-05): concrete subfloor → Type I Organic Adhesive → QuietCork 1/2” Underlayment → Latex-Portland Cement Mortar Bond Coat → Ceramic Tile → Epoxy Grout. Perimeter Isolation Barrier and Resilient Caulk at wall.
Movement Joints (Mandatory)
Movement joints are not optional in tile over QuietCork installations. The architect must specify the type and location. Movement joints are required at the perimeter and for above-grade structural slabs, with spacing of 8-12 feet. Follow TCNA Method EJ171.
Common Mistakes to Avoid
Skipping the vapor retarder when your flooring manufacturer requires one - QuietCork does not substitute for it
Gluing or fastening hardwood to cork in a floating installation - it must move freely
Allowing hardwood to contact the perimeter isolation strip - there must always be a clear expansion gap
Filling the expansion gap with caulk, grout, or rigid filler - this locks the floor and defeats the purpose of the expansion gap
Fastening baseboard to the floor. It must be wall-anchored only
Skipping movement joints in tile installations. Preventing expansion causes grout cracking and tile failure.
Not rolling the cork underlayment after glue-down installation (prior to installing the floor). The 75–100 lb roller step is critical for bond integrity
A Note on Conflicting Instructions
Where these guidelines differ from your hardwood or tile flooring manufacturer’s written installation requirements, the flooring manufacturer’s directions govern. Always consult local building codes where applicable.
Questions? We’re Here to Help.
For technical assistance, reach the Jelinek Cork Group team:
Email: cork@jelinek.com
Phone: 1-800-959-0995
Website: jelinek.com
Where to Purchase QuietCork Underlayment: Corkstore Canada or Corkstore USA
Full installation guides are available on our Install & Maintenance Guides page.